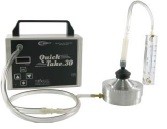
4. Install the free end of the adapter tubing onto the calibration adapter.
5. Press the calibration adapter onto the BioStage inlet until a fi rm seal is established.
6. Connect the BioStage outlet to one end of the ¼-inch ID tubing.
7. Insert the small end of a second Luer adapter into the free end of the ¼-inch
tubing.
8. Insert the large end of the second Luer adapter into one end of the 3/8-inch
sampling tubing and the pump inlet adapter into the other end.
9. Insert the pump inlet adapter into the pump inlet.
10. Calibrate the sample pump to 28.3 L/min for a Standard BioStage or
14.15 L/min for BioStage 200 (see calibration procedure in QuickTake 30 operating
instructions 40079).
11. When calibration is complete, remove the calibration adapter and tubing and
fl owmeter.
The calibration adapter and rotameter are for use with both models of BioStage. See Accessories/
Replacement Parts.
Sample
Read the following before sampling.
• Sanitize hands or wear disposable gloves. Sanitize hands and clean the BioStage
Impactor in between samples.
• Never use agar that has expired, displays visible cracks, or has been contaminated.
• Allow agar plates to warm up to ambient temperature (approximately 20 minutes)
before use.
• When sampling indoors, close all doors and windows that could affect airfl ow in the
sampling area.
1. The BioStage outlet should be connected to
the pump inlet with fl exible tubing or using
the Mounting Bracket accessory (Cat. No.
228-9531); see Operating Instructions 40066
supplied with that accessory (see right).
2. Remove the inlet cone and jet classifi cation
stage from the BioStage. Place a new,
unexposed agar plate into the base plate (see
Assemble with Media). Remove the lid from
the agar plate and place in a clean resealable
bag. Reassemble the impactor.
3. Turn on the pump and sample for 2 to 5 minutes.
Sampling for too long can cause overgrowth of sample. Sampling times that are
too short can cause false negatives.